Usage
This page will cover basic usage of the Mod Generator. Prerequisites: Barotrauma Mod Generator, Barotrauma.
Mod Generator Window
After installing the Mod Generator, boot it. You should see this window:
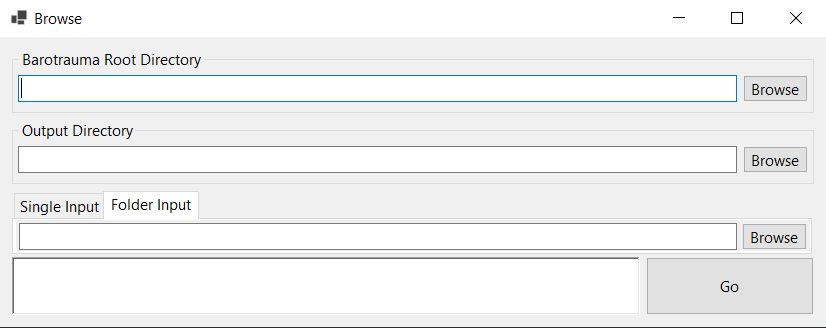
Here’s a quick overview of the various fields:
- Barotrauma Root Directory:
- Path to where Barotrauma is installed.
For example,
C:\Program Files (x86)\Steam\steamapps\common\Barotrauma.
- Output Directory:
- Path to where you want the generated mod to be put.
For example,
C:\Program Files (x86)\Steam\steamapps\common\Barotrauma\Mods\MyMod.
- Folder Input:
- When this tab is active, the Mod Generator will look through the entire folder to find diff files, other XML files, and assets, and put the generated mod in the output directory.
This is useful when working on a mod with multiple files.
Since the Mod Generator copies non-diff XML files, you can also use this to include your
filelist.xmlin the source location.
- Single Input:
- When this tab is active, the Mod Generator will only process a single file which you navigate to.
- Text box:
- This is used to display the Mod Generator’s progress.
Syntax Crash Course
The diff files used by the Mod Generator have a specific root element, to let it know that the file it’s reading is for editing base game files rather than copying across to the target directory. This element has a few specific attributes that it uses to determine program parameters.
<Diff file="Content/Items/Weapons/weapons.xml" override="all" cleanup="true">
Let’s break down each attribute.
file:This attribute contains a path to the file you want to edit. You might notice that it is relative to the Barotrauma install directory. Doing this makes it easy for you to give the source to another person to generate, and keeps the paths short.
override:This attribute controls how the Generator creates
overrideelements inside the modded XML. It expects one of several options:none:Don’t override any elements. Each edited object will be left as it is immediately after editing.
root:Override the root element. For example,
<Items>
    <Item identifier="foobar"/>
</Items>
becomes
<Override>
    <Items>
        <Item identifier="foobar"/>
    </Items>
</Override>
This is needed for overriding some elements, such as AI behavior or afflictions. It can also be used for overriding many items at once, making the generated XML nicer to read.
some:Search each element in the diff for the
overrideattribute and override the element is changes. For example,<Diff file="Content/Items/Weapons/weapons.xml" override="some" cleanup="true"> <replace sel="/Items/Item[@identifier='spear']/Price/@baseprice" override="true">100</replace> <replace sel="/Items/Item[@identifier='alienspear']/Price/@baseprice">500</replace> </Diff>
produces
<Items>
    <Override>
        <Item name="" identifier="spear" category="Equipment" interactthroughwalls="true" cargocontaineridentifier="metalcrate" tags="mediumitem,harpoonammo" Scale="0.5" impactsoundtag="impact_metal_light">
            <Price baseprice="100" soldeverywhere="false">
                ...
            </Price>
            ...
        </Item>
    </Override>
    <Item name="" identifier="alienspear" category="Equipment" interactthroughwalls="true" cargocontaineridentifier="metalcrate" tags="mediumitem,harpoonammo" Scale="0.5" impactsoundtag="impact_metal_light">
        <Price baseprice="500" soldeverywhere="false">
            ...
        </Price>
        ...
    </Item>
</Items>
However, adding a duplicate identifier will not work, so you should override everything you change.
cleanup:This is a boolean attribute (
true/false). When set totrue, the Mod Generator will delete all the things you didn’t change before saving the file. This avoids creating duplicate entries, or having to override everything. For the most part, you wantcleanupto be set totrue.
The Diff element contains a series of child elements called Patch Operations.
There are three patch operations: add, remove, replace.
Each patch operation takes an attribute called sel, which is an xpath to the location of the change.
For add operations, the element will be added as a child of the selected element.
For remove and replace operations, the element or attribute selected will be affected.
XPath syntax is relatively straightforward: you specify a series of elements from the root down until you reach the element or attribute you want to change.
Elements are separated by a /, and attributes are selected with @.
Elements can be filtered in various ways by using [].
Fully explaining xpath syntax is beyond the scope of this documentation, so instead here are some resources:
- https://www.w3schools.com/xml/xpath_intro.asp
- https://developer.mozilla.org/en-US/docs/Web/XPath
- http://xpather.com/ - for testing xpaths, very useful!
Some example XPaths that might be useful in the context of Barotrauma:
/Items/Item/Price
/Items/Item[@identifier='harmonica']/Price/@baseprice
//@ambientlightcolor
/Items/Item[starts-with(@identifier, 'op_vendingmachine')]